today is 2019 now, it should not be a hard task to achieve that of intalling a lace frontal wig. Even better, it should not cost you an arm and leg to crown your beauty right from the head. How about a wig?
You may either want to wear it to enjoy varieties of hairstyles or essentially to cover your lost hair. Do you have an idea of how to put it well on your head in order to appear classy and beautiful? It is important to learn how to wear the wig because it may help protect you from the hot sun and even when going on vacation. I am here to give you important information on how to put it on well without a struggle.

But let me tell you our short story and our obsession with wigs. Shelahair.com Company exists in the beauty and fashion market providing the best quality hair products at affordable prices.
For several years, we have been at lead in providing the latest wig fashions.In 2019, the latest wig is the 613 blonde hair, which is of high quality guaranteed to satisfy your desire to look good. The wig lasts longer.
Whether your hair is short or long, here are tips of keeping your wig secure in place. In this article am going to vividly explain to you how to put on that wig in a proper way.
What you need to do it right and first, you will need a pair of scissors, wig adhesive, wig cap, scalp protector, adhesive brush, blow dry and the wig itself.
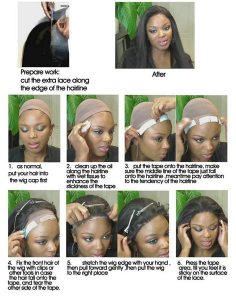
- Preparation
To begin with, using soap and enough water, wash your scalp since it is the application area. This helps to keep it free from oil. Directly spray your scalp protector on the head. This protector acts as a barrier between the adhesive and your scalp.
Using a small brush, apply the adhesive to the parts of the head where your wig will be attached to. After this application, blow-dry in a chilly air setting the adhesive for a period of around 30 seconds. Using your two hands, take the front section of your wig and place it on the forehead. Then press it firmly for about a minute or more. Go on to attach the matching sides to your scalp then press again more strongly for about 60 seconds.
- Trimming the lace on the wig
Take the whole lace wig and trim. This trimming is usually done once for the first time to use the wig. It is worth noting that, if the manufacturer has already trimmed the lace, you have no need to trim it. In the process of trimming the lace, ensure the wig is on your head and then using hair clips fasten it back leaving your scalp safe.
By use of a sharp pair of scissors, cut any lace sticking out beyond the hairline of the wig. In order to avoid accidentally cutting more of the laces than necessary, ensure that you cut very small amounts of the same. Ensure that you do not cut any piece of the wig. You can leave a little lace of less or equal to 1 inch.
2. Protect the skin
Do you know that body oils can prevent your adhesive from properly sticking on your scalp? I think you should know. To avoid this barrier, use a cotton ball soaked with isopropyl alcohol to clean your skin at the hairline.If your skin is sensitive, then it is important that you apply some scalp protector on the skin by the hairline. This will protect your skin from any damage or infections of whatever kind.
3. Application of adhesive
Using your fingers, now apply your preferred gel or the product to control your edge. This is aimed at ensuring that your edge is laid down to greater perfection. If you are using an adhesive glue, ensure that you apply a little of it to your hairline using a cosmetic stick or a small brush for makeup.
Note that you should not apply your wig immediately in case you use an adhesive for the soft bond. You should wait for the glue to become tacky before you have your wig in place. On the contrary, if you use the hard bond adhesive, you can immediately apply your wig. This is because this glue is able to bond with immediate effect.
4. Attaching the wig
At this stage, it is now safe to attach your wig on your head. You should now line your 613 BLONDE hair wig as desired and then secure it over your hair using wig combs. Avoid pulling it too tight. If you are using glue for attaching wig, start attaching from the hairline in the forehead front middle.
Press gently the wig edge down against your glued skin. After that then work around the entire hairline to ensure that the wig is fully attached as desired.
- Styling your wig
In this final step, you are free to pull down your wig and adjust it as it seems necessary. Flat iron the wig to smooth it down to resemble your hair. For about 5 seconds, press the wig edges down against your skin to ensure that the adhesive is stuck.
You can now style your beautiful wig as you may desire. For good positioning, ensure that middle of the hairline of your wig is in line with your forehead’s middle at the point of your hairline.

Wrap up
After reading and understanding this step-by-step tutorial, there is no reason you should struggle putting on your wig. Just to remind, Shelahair.com has all the wigs you need to remain tidy and beautiful on your head.
Our human hair wig or natural hair wig are all ready for you. Make a decision to be smart by putting on your wig the right. Cheers to all ladies out there who can never have enough of wigs.